Migrating to UIContentConfiguration
— UIKit, CollectionView, UIContentConfiguration — 13 min read
Today we're showcasing how to migrate an existing UICollectionViewCell subclass into the
new modern technique using UIContentConfiguration and UIContentView.
What the... content?
iOS 14 brought a modern techique to build and configure collection views by leveraging the
new protocol UIContentConfiguration.
This not only offers a performant way to represent cell's data structures, but also gives it
a canonical way of dealing with state changes, all while conforming to modern standards
and offering builtin swift type-safety.
This completes the puzzle first introduced in iOS 13 with the addition of new modern ways to
create collection views using UIDiffableDataSource and UICollectionViewCompositionalLayout.
When the stock solution isn't enough
iOS 14 also introduced simpler and leaner UICollectionViewListCell, which takes away
some of the burden of the cell definitions, by adding a built-in state, accessories and content and
background configurations.
Even having UICollectionViewListCell, we sometimes need to define custom layouts for our cells.
This is also true for content: the cell's UIListContentConfiguration is quite limited,
offering only a handful of the most common uses, such as text properties
and static images. But what if we need to define a slightly more complex layout?
When not to use UIListContentConfiguration:
- the images come from a url, instead of from a static source
- we use different trailing markers as the ones provided in the accessories
- we have a complex layout, outside title/subtitle/icon
- we use shadows, layer transformations, etc.
A Simple(ish) Cell
Consider this cell UI:

To configure it, we'll need these basic properties:
- Title
- Subtitle
- Image
- isRead indicator
The layout is simple enough, but in this case we can't use the stock UIListContentConfiguration.
This is because the image is not a static image from assets, and instead comes from a url.
Moreover, we need to add a trailing indicator (the purple dot), to inform the user whether
the contents of this cell are read or not.
Those properties are not handled in the defaultContentConfiguration(), so we'll need
to define our own.
Starting point
Let's see the starting point we had, since you probably have something similar in your codebase.
1public class SimpleCollectionViewCell: UICollectionViewListCell {2
3 private var titleLabel: UILabel!4 private var subtitleLabel: UILabel!5 private var photoImageView: UIImageView!6 private var trailingIndicator: UIImageView!7
8 override init(frame: CGRect) {9 super.init(frame: frame)10
11 /// Layout Code12 }13
14 required init?(coder aDecoder: NSCoder) {15 fatalError("init(coder:) has not been implemented")16 }17
18 override public var isSelected: Bool {19 didSet {20 if isSelected {21 contentView.backgroundColor = .cellSelectionBackgroundColor22 } else {23 contentView.backgroundColor = .defaultBackgroundColor24 }25 }26 }27
28 override public var isHighlighted: Bool {29 didSet {30 contentView.backgroundColor = isHighlighted ?31 UIColor.systemGray3 :32 UIColor.defaultBackgroundColor33 }34 }35}This cell has a couple of labels and image views. To render its contents,
it defines a ViewModel (which holds the data) and a method to configure its subviews
as such:
1extension SimpleCollectionViewCell {2 public struct ViewModel: Hashable {3 public let id: String4 public let photo: UIImage5 public let title: String6 public let subtitle: String?7 public let isRead: Bool8 }9
10 public func configureFor(viewModel: ViewModel) {11 titleLabel.text = viewModel.title12 subtitleLabel.text = viewModel.subtitle13 photoImageView.image = viewModel.photo14 trailingIndicator.isHidden = viewModel.isRead15 }16}When we dequeue the cell from the collection view, we just need to call
configureFor method to properly populate our subviews with the data.
Below you can see how we would implement a UICollectionDiffableDataSource,
dequeueing this cell:
1let simpleCellRegistration = UICollectionView.CellRegistration2 <SimpleCollectionViewCell, SimpleCollectionViewCell.ViewModel> { (cell, indexPath, vm) in3 cell.configureFor(viewModel: vm)4}5
6let dataSource = UICollectionViewDiffableDataSource<Section, Item>7 .init(collectionView: collectionView) { (cv, indexPath, item) -> UICollectionViewCell? in8 switch item {9 case .simpleCell(let vm):10 return cv.dequeueConfiguredReusableCell(11 using: simpleCellRegistration,12 for: indexPath,13 item: vm14 )15 ...16 }17}18...19enum Section {20 case onlySection21}22
23enum Item: Hashable {24 case simpleCell(SimpleCollectionViewCell.ViewModel)25}We ensure the type passed to the cell is appropriate by making the Item
contain the SimpleCollectionViewCell.ViewModel, so that when we call the registration
handler that type is the ViewModel for this particular item.
Below is a diagram depicting the process from dequeueing the cell to displaying it, up until now:
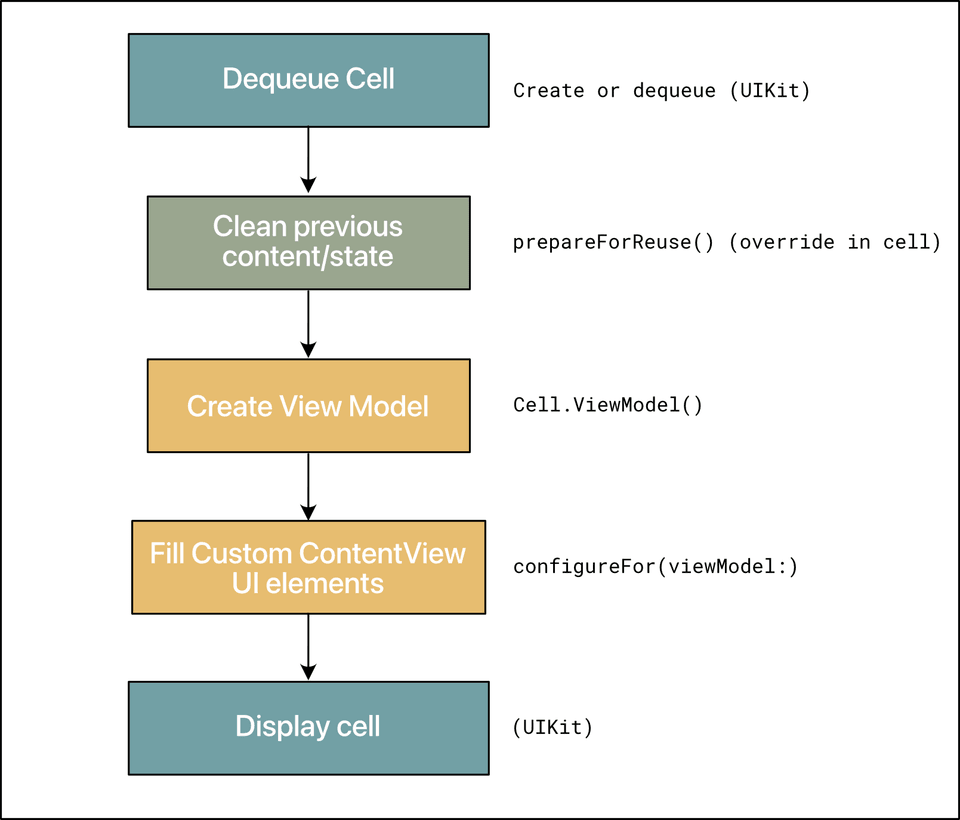
Notice the creation and configuration steps are done sepparately. Thus, we need to remember configuring the cell after dequeuing it.
This is easy enough, and for most cases it just works. Let's now see how we can move on to modern cell configurations and see what value this can bring us.
Moving to UIContentConfiguration
We want to migrate this ViewModel to the new technique UIContentConfiguration, wich will
handle not only the data the cell needs (id, photo, title, subtitle and isRead),
but also the cell state, including our familiar properties when building lists
such as isSelected and isHighlighted.
The great thing about this new protocol is that we'll be able to decouple our view layout
from UICollectionViewCell. This way, we'll have a composable structure that we can reuse
elsewhere in our code, if need be.
First we want to take a look at the UIContentConfiguration protocol:
1public protocol UIContentConfiguration {2
3 /// Initializes and returns a new instance of the content view using this configuration.4 func makeContentView() -> UIView & UIContentView5
6 /// Returns the configuration updated for the specified state,7 /// by applying the configuration's default values for that state8 /// to any properties that have not been customized.9 func updated(for state: UIConfigurationState) -> Self10}-
makeContentView()ensures that the configuration creates a new view to serve as a contentView for the cell. This view needs to be both aUIViewand aUIContentView, which enforces that the view has aUIContentConfigurationstored. -
updated(for:)returns a new configuration applying a given state. This will allow us to, for example, change the cell background color when the user taps it.
Our custom configuration will have to implement both functions. We'll define it as follows:
1public struct Configuration: UIContentConfiguration {2 public let id: String3 public let photo: UIImage4 public let title: String5 public let subtitle: String?6
7 private(set) var state: UICellConfigurationState?8
9 public init(10 id: String,11 photo: UIImage,12 title: String,13 subtitle: String?,14 state: UICellConfigurationState? = nil15 ) {16 self.id = id17 self.photo = photo18 self.title = title19 self.subtitle = subtitle20 self.state = state21 }22
23 public func makeContentView() -> UIView & UIContentView {24 View(configuration: self) // To be defined25 }26
27 public func updated(for state: UIConfigurationState) -> SimpleCell.Configuration {28 var mutableCopy = self29 if let cellState = state as? UICellConfigurationState {30 mutableCopy.state = cellState31 }32 return mutableCopy33 }34
35}Here we moved all the code in the ViewModel struct into this new Configuration type.
We also added the state property on it, which will hold relevant properties
such as isSelected or isHighlighted. This object is created by UIKit when the user
interacts with cells in lists.
Also, the updated(for: UIConfigurationState) function is now very straightforward:
since we're using a struct to hold this data, we can add a new variable
and just use self and let copy-on-write do its job. This allows this function to just
mutate the new properties, and to return a fresh copy for the view to be reconfigured.
We also need to define our view. It must be both UIView and UIContentView.
That in turn requires that it has a configuration set in.
Furthermore, it will have a init(configuration:), so that it can be instantiantiated
from the makeView() method.
1public class View: UIView & UIContentView {2 public var configuration: UIContentConfiguration3
4 ...5
6 init(configuration: Configuration) {7 self.configuration = configuration8 super.init(frame: .zero)9 ...10 // Layout Code11
12 configureFor(configuration: configuration)13 }14}In the init method, we'll also include all the layout code the previous SimpleCollectionViewCell
had. Note also that here we must configure the view, meaning populating its
UILabel, UIImageView, etc. with actual content, which is passed in the init method.
This configureFor(configuration:) has basically the same code it had before, but it will also
contain the code to style the state changes in the cell
1public func configureFor(configuration: Configuration) {2 titleLabel.text = configuration.title3 subtitleLabel.text = configuration.subtitle4 photoImageView.image = configuration.photo5 if let state = configuration.state {6 backgroundColor = {7 if state.isSelected {8 return .cellSelectionBackgroundColor9 } else if state.isHighlighted {10 return .systemGray311 } else {12 return .defaultBackgroundColor13 }14 }()15 } else {16 backgroundColor = .defaultBackgroundColor17 }18}Note that here we merged the two properties related to state, isSelected and isHighlighted
in a single state change. State now doesn't have to be defined all over the UIView subclass,
and it can be set from one single method, simplifiying a lot the code.
That was quite a bit of moving around the code, but the code itself keeps being the same. Now we have a cell configured and ready to display from the get-go. But how would we use this in a collection view?
Configuring our UICollectionViewDiffableDataSource
We now have a working UIView with all it's inputs and outputs well defined. At this stage,
we recommend adding snapshot tests
to make sure the view looks exactly like you'd expect.
Now, to use this view as a cell in a UICollectionView, there's a secret that we haven't
told you: beggining iOS 14 UICollectionViewCell defines a new property:
1@available(iOS 14.0, tvOS 14.0, *)2extension UICollectionViewCell {3 @available(iOS 14.0, tvOS 14.0, *)4 public var contentConfiguration: UIContentConfiguration?5}The documentation states that:
Setting a content configuration replaces the existing
contentViewof the cell with a new content view instance from the configuration, or directly applies the configuration to the existing content view if the configuration is compatible with the existing content view type.
This means that it'll rip out it's contentView, and use the view provided by your
UIContentConfiguration in it's makeContentView() method. No more subclasses of
UICollectionViewCell 🎉!!!
Now that we know this, our registration and dequeue process looks much like the same as before, but applying the configuration instead:
1let simpleCellRegistration = UICollectionView.CellRegistration2 <UICollectionViewCell, UIContentConfiguration> { (cell, _, configuration) in3 cell.contentConfiguration = configuration4}5
6let dataSource = UICollectionViewDiffableDataSource<Section, Item>7 .init(collectionView: collectionView) { (cv, indexPath, item) -> UICollectionViewCell? in8 switch item {9 case .simpleCell(let configuration):10 return cv.dequeueConfiguredReusableCell(11 using: simpleCellRegistration,12 for: indexPath,13 item: configuration14 )15 ...16 }17}We do need to change how the dataSource's Item is defined:
1enum Item: Hashable {2 case simpleCell(SimpleCell.Configuration)3}Now we store the actual SimpleCell.Configuration we defined previously.
Also, UIKit is now in charge for some changes on that configuration: in the case for a state change,
UIKit will immediatly call SimpleCell.Configuration updated(for state:) method, which in turn will
update the configuration on the SimpleCell.View and call configureFor(configuration:), so everything is
kept in sync.
Moreover, if there's a data change and we need to call reconfigureItems() on the dataSource,
the cell will be dequeued, which will set the configuration again, calling updated(for state:).
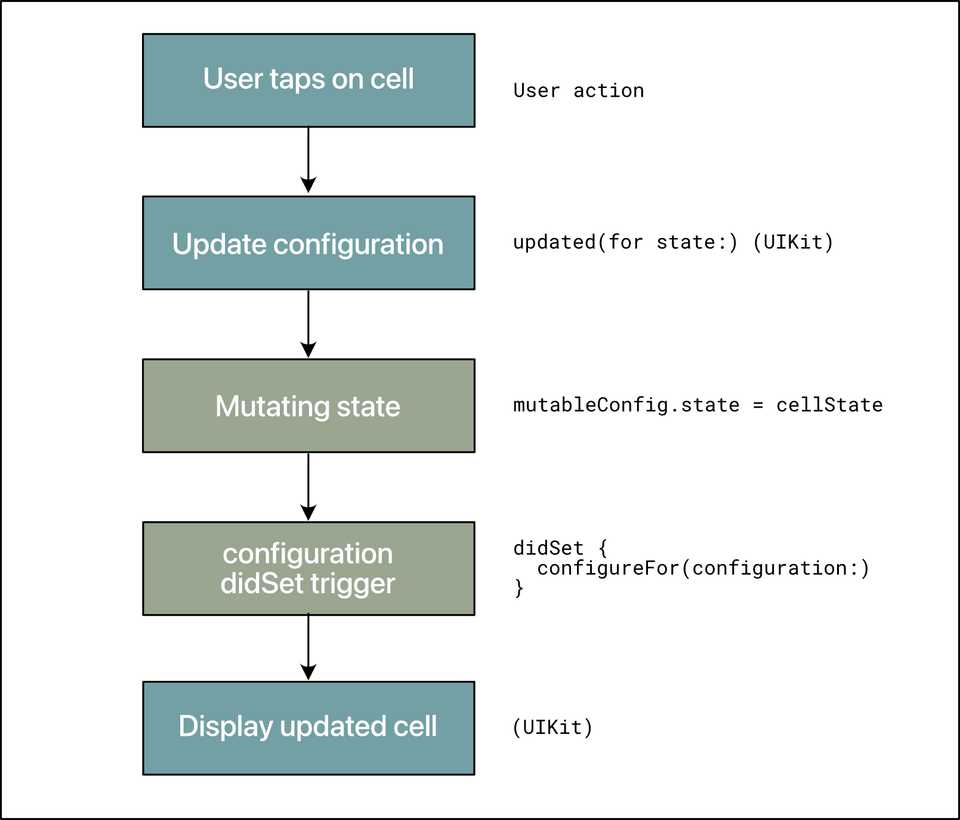
This here shows the diagram of the different steps involved in the dequeueing and displaying of the cells.

We really are doing the same steps as before, just in a different order. Instead of dequeueing the cell, creating the ViewModel and then assigning it to the cell, we are creating the Configuration and assigining it to the cell, which in turn creates the content view under the hood. However, notice here we're merging the creation and configuration of the view in a single step, and that may have some impact on the layout definition, since now we new can't create a cell on its own, and it needs to have a configuration ready beforehand.
So far we saw how we create a cell using the configuration. But if we tap on the cell, the background is not being changed. This is because we lack the last piece of the puzzle: Updates.
How are changes in the configuration affecting the view?
As we can see from the updated(for state:) method, we can mutate the configuration whenever a change
is needed. This in turn will change the instance of the configuration defined in SimpleCellView.
But that does not change any views yet. So we need to set a trigger for that to happen. So we add
a didSet trigger to the SimpleCellView's configuration:
1public var configuration: UIContentConfiguration {2 didSet {3 guard let oldConfig = oldValue as? Configuration,4 let config = configuration as? Configuration else { return }5 if oldConfig != config {6 self.configureFor(configuration: config)7 }8 }9}Here we make sure that if the configuration really changed, we call
configureFor(configuration: config). To do this, we need to make Configuration
conform to Equatable as well. But aside from that, we just need to call
configureFor(configuration:) again to see the change take effect.
Here's a diagram of the update process
And thats really it! Here you can se the complete code.
1public enum SimpleCell {2 public struct Configuration: UIContentConfiguration, Identifiable, Equatable {3 public let id: String4 public let photo: UIImage5 public let title: String6 public let subtitle: String?7
8 private(set) var state: UICellConfigurationState?9
10 public init(11 id: String,12 photo: UIImage,13 title: String,14 subtitle: String?,15 state: UICellConfigurationState? = nil16 ) {17 self.id = id18 self.photo = photo19 self.title = title20 self.subtitle = subtitle21 self.state = state22 }23
24 public func makeContentView() -> UIView & UIContentView {25 View(configuration: self)26 }27
28 public func updated(for state: UIConfigurationState) -> SimpleCell.Configuration {29 var mutableCopy = self30 if let cellState = state as? UICellConfigurationState {31 mutableCopy.state = cellState32 }33 return mutableCopy34 }35
36 }37
38 public class View: UIView & UIContentView {39 public var configuration: UIContentConfiguration40 private var titleLabel: UILabel!41 private var subtitleLabel: UILabel!42 private var photoImageView: UIImageView!43
44 init(configuration: Configuration) {45 self.configuration = configuration46 super.init(frame: .zero)47 ...48 // Layout Code49
50 configureFor(configuration: configuration)51 }52
53 public func configureFor(configuration: Configuration) {54 titleLabel.text = configuration.title55 subtitleLabel.text = configuration.subtitle56 photoImageView.image = configuration.photo57
58 if let state = configuration.state {59 backgroundColor = {60 if state.isSelected {61 return .cellSelectionBackgroundColor62 } else if state.isHighlighted {63 return .systemGray364 } else {65 return .defaultBackgroundColor66 }67 }()68 } else {69 backgroundColor = .defaultBackgroundColor70 }71 }72 }73}Bonus Track: SwiftUI
You might be wondering: "is this change worth it? What's in it for me?"
Moving to this architecture GREATLY improves the experience when bridging these views to SwiftUI. It should be as simple as:
1import SwiftUI2
3extension SimpleCell {4
5 struct SwiftUIView: UIViewRepresentable {6
7 let config: Configuration8
9 func makeUIView(context: Context) -> SimpleCell.View {10 config.makeContentView() as! SimpleCell.View11 }12
13 func updateUIView(_ uiView: SimpleCell.View, context: Context) {14 uiView.configureFor(configuration: config)15 }16
17 typealias UIViewType = SimpleCell.View18 }19}A little more of code should be required to handle updates to this view, but should not be hard, let's leave that as homework 😅.
This data-driven approach trickling down in UIKit it's greatly appreciated and makes it easy to maintain UIKit projects.
Conclusion
With that, is as simple as changing types wherever we used SimpleCollectionViewCell to the new
SimpleCell.View and SimpleCollectionViewCell.ViewModel to SimpleCell.Configuration.
And that's it! Using that structure we can now implement the same things we previously had, without the hassle of having all the state properties attached to the view, all while relying on UIKit to do the heavy lifting of deciding when to update content and state.
Moving on from here
This covers how we would implement a custom UIContentConfiguration.
For many cases, though, using the stock UIListContentConfiguration and a plain UICollectionViewListCell
may be enough. You can read more about it on WWDC notes and
from the WWDC 2020 Session itself
There is one final caveat: we're currently using the whole Configuration struct as the Item for the
UICollectionDiffableDataSource<Section, Item>, instead of asigning it the ID.
This works, but according to apple's principles it may lead to bad performance or ocasional crashing.
Plus, using only the ID as a reference would allow us to use reconfigureItems,
first introduced in iOS 15, to reload any changes on a cell using this same technique.
So head on to our next article, where we discuss how to implement a data source using this same structure, but relying on IDs or simple enums as the data source items instead of the whole Configuration object.
Cheers!